Owning your DNS Stack: Towards a more Decentralized Internet
🔗 Introduction
Domain Name System (DNS) is a protocol for naming servers on the internet that host websites. Since computers on the internet are recognizable to each other only by their IP addresses which is a unique numerical label, for convenience every website uses a fairly recognizable domain name (www.ietf.org) to point users to their own servers (4.31.198.44) hosting the website by the means of the DNS system, where a DNS server provides the mapping between the domain name and the server IP address.
However the current architecture of DNS servers and domain name issuers is highly centralized and controlled by a few organizations and corporations of the world.
🔗 The Dark Underbelly
Having such a critical part of the Internet infrastructure be a central point of failure can have devastating effects and is against the founding principles of the internet envisioned by its creators.
There have been various instances where websites and user information has been compromised by hijacked DNS systems and domain names 1 as well as large scale internet outages due to design flaws being exploited in the DNS protocol 2.
Much of the hierarchy and centralization of the DNS system stems from the need to have a trusted party between domain/website owners and users, mainly TLD root domain owners (e.g. ICANN for .com) who verify the ownership of domain names and make sure only authorized personal can update DNS records of a website.
For a long time there hasn't been a technically better system available that wouldn't require trusting a third party as a design requirement. That is until now…
🔗 Handshake
With the advent of blockchain and it's echoing principles of the early internet and cypherpunk, it provides a novel socio-economic-cryptographic solution for avoiding the need to require placing trust in middlemen in inherently peer-to-peer systems.
The Handshake network is a decentralized, permissionless naming protocol backed by a blockchain designed to solve the trusted 3rd party problem with root DNS naming zones (TLD's) and Certificate Authorities.
If you are a domain owner wanting to use the Handshake network, owning a Handshake name involves quite a few steps for which there are already a lot of good resources available on the internet (see for example namebase.io). So, in this post we are going to focus on how you can use Handshake as an end user and start relying on handshake for resolving traditional and handshake names.
🔗 Setup
The Handshake networks is made up of nodes acting as peers and exchanging messages with every other node in the network. To participate in the network you need to run the node software yourself on a machine or server.
The Handshake org provides open source software that is built according to the Handshake protocol spec and has mainly two kinds of nodes:
We are gonna setup the full node hsd daemon as our DNS resolver. Since it's a full node we are gonna need to maintain the full chain state which can easily take multiple gigabytes (around 3-4 GB) of storage along with a 24×7 running system on your home network. The recommended hardware for this is:
- A Raspberry Pi or any other single board computer with at least 2 GB of Ram running a Linux OS
- A portable/external HDD/SDD with least a 500GB storage space.
If you'd rather not run the full node or don't have a device with sufficient storage space you can setup a light node instead which will only take up a few megabytes of storage instead of gigabytes. For brevity I'm only gonna discuss setting up the full node here.
Once you have the required hardware we can start setting up the software. I'd recommend using docker images to avoid dependency hell.
You can build your own docker image from the hsd repo or use a pre-built one I have over at docker hub at shalzz/hsd.
docker pull shalzz/hsdAdd a volume mapping a folder on your external hdd to /root/.hsd and expose the required ports according to the command line hsd --ns-host 0.0.0.0 --ns-port 5300 --rs-host 0.0.0.0 --rs-port 53
Here is the same thing as a docker-compose.yaml:
services:
  hsd:
    container_name: hsd
    image: hsd:2.2.0-a1409dc4
    volumes:
      - '/media/sda1/hsd-data:/root/.hsd'
    ports:
      - "53:53/tcp"
      - "53:53/udp"
      - "5300:5300/udp"
      - "5300:5300/tcp"
    command:
      - 'hsd'
      - '--ns-host'
      - '0.0.0.0'
      - '--ns-port'
      - '5300'
      - '--rs-host'
      - '0.0.0.0'
      - '--rs-port'
      - '53'
    restart: unless-stopped
Once you have the hsd daemon running you can override the DNS server settings for either your individual devices on your home network (desktop, Smart TV) but it's better and easier to override the DNS server settings in your Wi-Fi router.
It's recommended to setup a static IP/lease to your local server to prevent breakage. Here's a guide to do so with the OpenWrt firmware.
🔗 Test
To make sure everything is working as expected you can query your DNS server specifically by its IP address. For e.g. if the device your hosting the server on has the IP address 192.168.1.224 on your home network, you can query it for a name via the dig program
$ dig @192.168.1.224 example.com

; <<>> DiG 9.16.10 <<>> @192.168.1.224 example.com
; (1 server found)
;; global options: +cmd
;; Got answer:
;; ->>HEADER<<- opcode: QUERY, status: NOERROR, id: 18916
;; flags: qr rd ra ad; QUERY: 1, ANSWER: 1, AUTHORITY: 0, ADDITIONAL: 2

;; OPT PSEUDOSECTION:
; EDNS: version: 0, flags: do; udp: 4096
; COOKIE: b07a0053413fad96 (echoed)
;; QUESTION SECTION:
;example.com.                   IN      A

;; ANSWER SECTION:
example.com.            86396   IN      A       93.184.216.34

;; SIG0 PSEUDOSECTION:
.                       0       ANY     SIG     0 253 0 0 20210108123100 20210108003100 32465 . 2MVUz5L0LOAi6RO5e2lZJTwmnSvVancyyVdSeAyp3lAxkcCtp7CD8HVx alVG4G/MfkUg9GIicKp/ZpQyY7BHpQ==

;; Query time: 36 msec
;; SERVER: 192.168.1.224#53(192.168.1.224)
;; WHEN: Fri Jan 08 12:01:00 IST 2021
;; MSG SIZE  rcvd: 162
If the status here is NOERROR and you see any entries under the ANSWER Section, you have successfully setup your own DNS server.
An additional benefit of using handshake network here is now in addition to traditional domain names you can resolve handshake names as well. Try visiting or resolving http://welcome.nb./
🔗 Adguard
Since you've come this far you might as well setup an Adblocking server as well that is using your hsd DNS server as an upstream.
There are two good options for adblocking self-hosting server
I find Adguard to be much more reliable and that is what I use personally. If you decide to go ahead with Adguard they already have great documentation to get up and running with docker.
Once you have Adguard running in addition to hsd you can setup Adguard to use hsd as an upstream server in the DNS settings page of Adguard. Make sure you change the port number you used earlier for hsd from 53 to something else since there can only be one process listening on a port as here adguard acts as a filter between clients and the actual DNS resolver.
For e.g. if your device IP address is 192.168.1.224 and the port of hsd is 54 use tcp://192.168.1.224:54 as an upstream server address for both Upstream DNS servers and Bootstrap DNS servers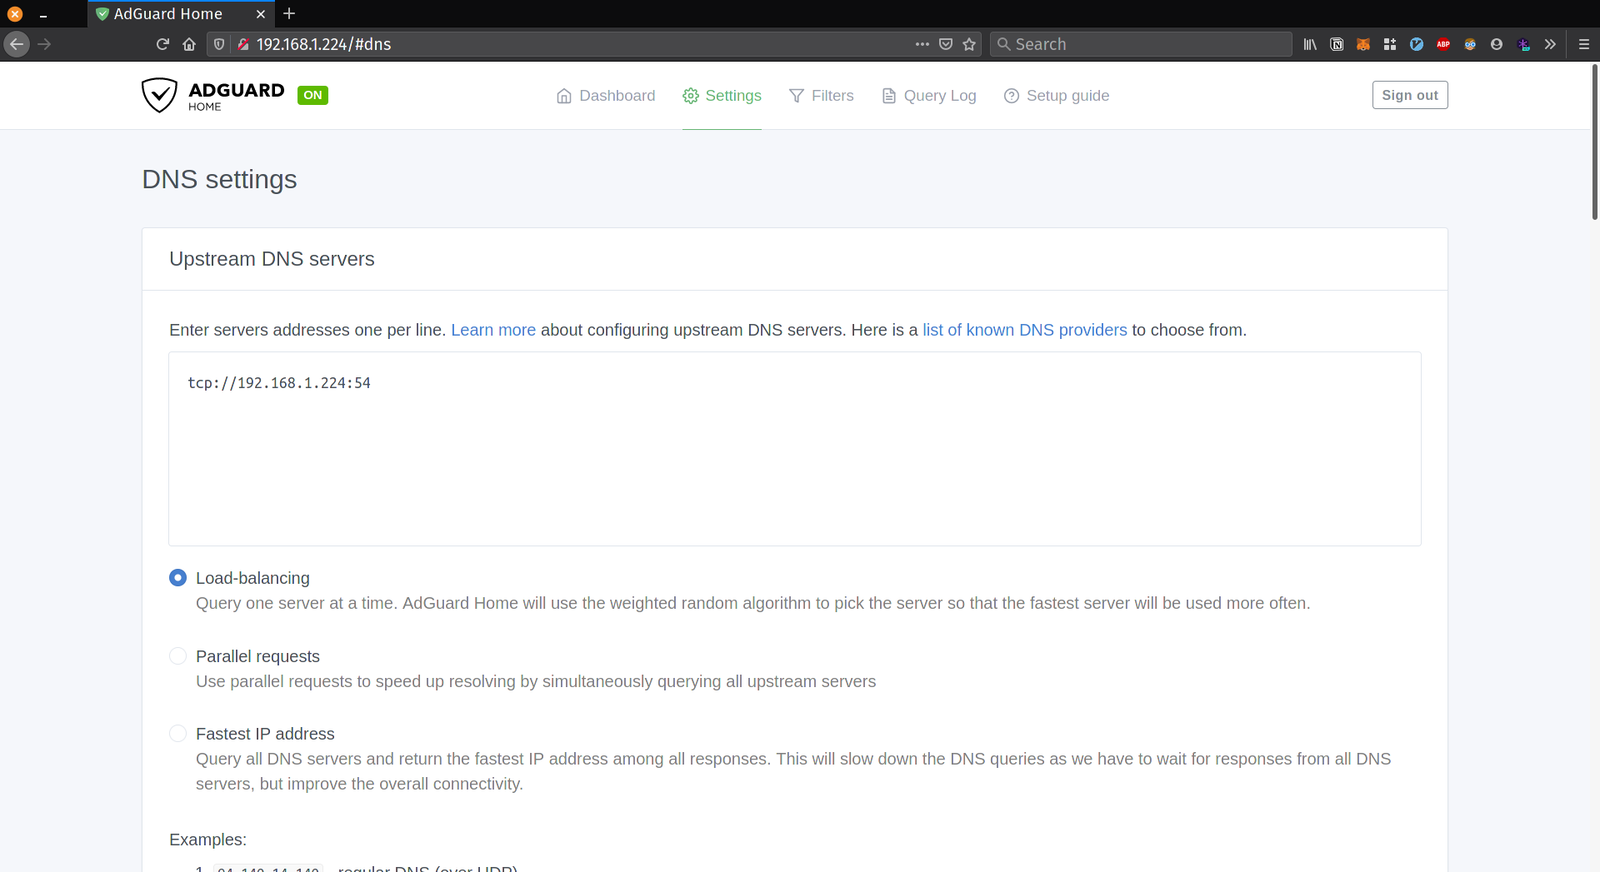
Here is the complete docker-compose.yaml file for setting up both hsd and adguard. Customize for your setup.
A Deep Dive on the Recent Widespread DNS Hijacking Attacks: "...hijacking the DNS servers for these targets, so that all email and virtual private networking (VPN) traffic was redirected to an Internet address controlled by the attackers..."
2016 Dyn cyberattack: The attack caused major Internet platforms and services to be unavailable to large swathes of users in Europe and North America.